For the cinnamon rolls, I made a streusel for the filling also found in the Williams-Sonoma book. It's a simple mixture of brown sugar, granulated sugar, cinnamon, flour, and some cold butter. Instead of making small balls out of the ensaimada dough, I made one big one and when it was time to roll it out, I rolled it to be a big square (or something that resembled that shape) and sprinkled the cinnamon streusel evenly on the dough, leaving about a 3/4"-1" border. Then I rolled it like a jelly roll and sliced about 1" rolls horizontally. Next time I make it, I'm going to use more dough and maybe a little less of the streusel. The good thing is that the streusel is delicious--in certain quantities.
The new bread recipe I tried today is called Challah which is a Jewish egg bread. Yum. I was especially attracted to it because it was braided and well, the ingredient list was short. If you ever have to braid a dough, make sure that the strands you roll are even or if you want it to have a little bit more of a diamond shape, leave it a little heavy in the middle. My boyfriend and I weren't really thinking and just rolled it a little sloppy. Instead of the diamond shape I was hoping more, we got an hourglass shape. LOL. But it was still beautiful and what's more important is that it tasted great! It was pretty moist and so soft! After baking it ended up being what looked like 2 feet! That's a big bread.
After I stopped by to help my mom a little at work, I came back home and made a little craft project that I had been planning for a few weeks now...but never got around to actually doing it. I'm going to try to post something of a tutorial since I really didn't know what I was doing going through it. I really just improvised my way through this one, but I'm happy with the results. I'm sure you'll have an easier time making this because for some reason, I'm terrible with making patterns.
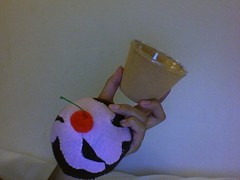
Anyway, I found a way to repurpose those plastic party cups that are always left behind at parties, some scrap fabric, an old pillow, some pom poms you might have lying around...you know, normal things. =]
Zero Calorie Recycled Cupcake
Skill Level: Intermediate
Total Approximate Cost: $9.00
Total Approximate Time: 1 - 2 hours
Materials
Plastic disposible party cups (I used the shorter, wider variety) - $0 if you have them. About $2 if you don't.
Felt - (Approximately three colors, depending on your design. You may want to get two sheets of each color just in case) $0.20 each
Thread in matching colors - Approximately $0.99 a spool, unless you have some
Red Pom Pom - Variety pack for $2.99
Green Embroidery Floss - $1.29
Flexible but Sturdy Cardboard - $0 I got mine from the bottom of a shopping bag
Adhesive (I used spray adhesive but it is a bit more expensive, so any glue is great, but Elmer's gets messy) - About $10 for Spray Adhesive (worth it!) and $1 for white glue
Some old newspapers or something to protect your workspace from getting sticky.
Old pillow or something you can use as stuffing.
Equiment
Sewing Needles $2.19
Directions
1) Make a pattern for the felt that will cover the exterior of your cup and cut it out.
2) Paste the felt you just cut out to the outside of the cup. (If you're using spray adhesive, make sure you cover your workspace just incase it sprays a little too far.)
3) With the color of your cake (the brown part, since I chose chocolate), cut a circle slightly bigger than the opening of your cup. Make a cardboard cutout the same shape and glue it to the felt.
4) Then cut a 1/4" strip of the same color the circumference of the circle you just cut out. Glue a strip of the cardboard to the strip.
5) When it is dry, sew the strip of felt and cardboard to the circle.
6) Cut a large circle of the same color (this will be the height of your cupcake) and sew it to the side of the strip that hasn't been sewn yet. (it's not going to be a perfect circle in the end. You'll have to cut about 3/4 way to the center and overlap it to make the circle fit the one you're sewing to. Wow that sounded confusing, I'm sorry it's late.) Before closing the circle, stuff the cake with the inside of a pillow.
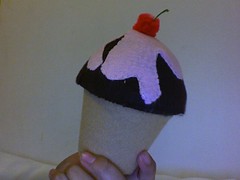
7) Now for the topping, cut out a random design to be the frosting (although it looks more like a ganache or glaze). Find the center of the cupcake and your frosting. Going through both the cake and frosting with the embroidery floss, attach the red pom pom. Secure it a few times, tie a knot, and leave about 1 1/4" of the floss sticking up, this is the cherry stem.
8) Sew or glue the frosting to the cake. You're done! Now you can hide fun things in your cupcake or just use it as decoration. Who knew cake could be so functional?
I'll post some pictures of the Challah and the recipe when I have more time. I'm already dozing off...

2 comments:
That's way cute! At first I was thinking, why would you make a fake cupcake...der der...to decorate! (And keep the secret key to the secret chest that holds all of your secret things. Nobody will ever know!)
I know I said that I was going to make ensaimadas, but I got a little too excited about getting a friend for my siamese fighting fish. So that kinda took priority. Hopefully I'll get to it this weekend. =)
Post a Comment