Check out more at her blog
Showing posts with label stencil. Show all posts
Tuesday, May 29, 2007
Some Inspired Work
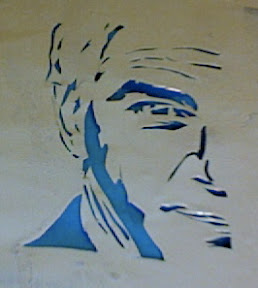
I'm so happy to say that this blog has inspired somebody to actually go out and try a project. Ok fine, it's my sister, but really, it's hard to inspire her enough to do any kind of project with her busy schedule and all. Here's an awesome stencil she made. =]

Check out more at her blog
Sunday, May 20, 2007
First Multilayer Stencil (and tutorial!)
The last video I posted featured a multilayered stencil and it got me so inspired, I decided to try my hand at one myself! And so we both benefit, I took lots of pictues so we could both learn.
Materials:
3 copies of your desired image preferrably printed on a thick cardstock, photo paper (that's what I used), or a transparancy sheet (that would probably work best)
Sharpie or pen you can mark with
X-acto Knife
Cutting Mat (or something you can cut on so you won't damage your furniture or blade)
Canvas or surface to spray your image on
4 cans of different colored spray paint (I used Raspberry, White, Black, and Primer)
Spray Adhesive
Old newspaper
Instructions:
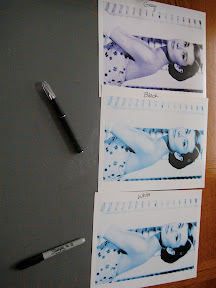
Select your image and print it 3 times. For some reason, my printer printed it out in weird colors (as if black and white wouldn't have been easier for it...) It also was being a little wierd on the quality, so I chose the darkest one for the "gray" stencil, the worst quality for the "white" stencil, and the last for the "black" stencil. Then I labeled them with my trusty sharpie so I wouldn't get confused or forget which was which.
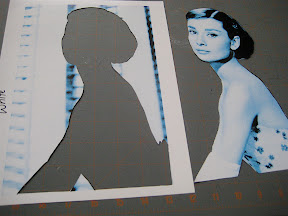
For the white stencil, cut out a sillouhette of your image. You may find it easier if you trace the image with your sharpie.
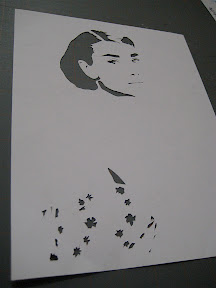
For the black stencil, cut out the darkest parts of the image. (Like the eyes, hair, nostrils, etc.)
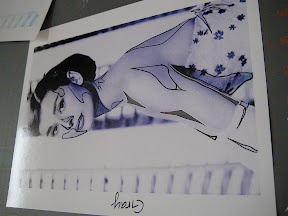
I saved the gray stencil for last since it requires a little more thought than the other two. For this one, I definitely recommend using your sharpie or marker to outline the darker shadows to cut out. It also helps you see if you like the look of your stencil before you regret cutting some of the pieces out.
Now for the fun part, spraying your image!
First, lay out your newspaper and center your canvas on your scrap paper. Then, spray your background color evenly on the canvas/surface. I did two separate coats so it was more even.
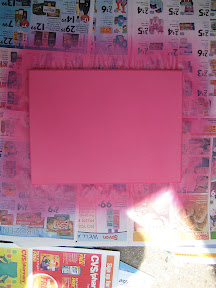
Always make sure that your paint is dry before you move on to the next step!
Spray a light coat of the adhesive on the back of your stencil to avoid overspray (or underspray!) You'll get cleaner lines if you do this step. I lined the bottom left hand corner of the image with the bottom left hand corner of the canvas so it would be easier to line the other two images. When the white coat is dry (and make sure it's completely dry!), align the gray stencil exactly where you aligned the first stecil, then spray the gray coat. (sorry, I forgot to take a picture of the white coat...)
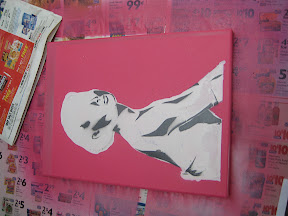
See that overspray on the top of the canvas? You definitely want to use some cardboard to cover any parts of the canvas that you don't want to be colored. Or you can tape some scrap paper to the edges of the stencil incase that happens. I was lazy so I didn't do that.
Now for the black stencil, do exactly what you did for the first two stencils.
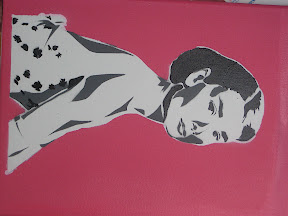
All done!
Materials:
3 copies of your desired image preferrably printed on a thick cardstock, photo paper (that's what I used), or a transparancy sheet (that would probably work best)
Sharpie or pen you can mark with
X-acto Knife
Cutting Mat (or something you can cut on so you won't damage your furniture or blade)
Canvas or surface to spray your image on
4 cans of different colored spray paint (I used Raspberry, White, Black, and Primer)
Spray Adhesive
Old newspaper
Instructions:
Select your image and print it 3 times. For some reason, my printer printed it out in weird colors (as if black and white wouldn't have been easier for it...) It also was being a little wierd on the quality, so I chose the darkest one for the "gray" stencil, the worst quality for the "white" stencil, and the last for the "black" stencil. Then I labeled them with my trusty sharpie so I wouldn't get confused or forget which was which.
For the white stencil, cut out a sillouhette of your image. You may find it easier if you trace the image with your sharpie.
For the black stencil, cut out the darkest parts of the image. (Like the eyes, hair, nostrils, etc.)
I saved the gray stencil for last since it requires a little more thought than the other two. For this one, I definitely recommend using your sharpie or marker to outline the darker shadows to cut out. It also helps you see if you like the look of your stencil before you regret cutting some of the pieces out.
Now for the fun part, spraying your image!
First, lay out your newspaper and center your canvas on your scrap paper. Then, spray your background color evenly on the canvas/surface. I did two separate coats so it was more even.
Always make sure that your paint is dry before you move on to the next step!
Spray a light coat of the adhesive on the back of your stencil to avoid overspray (or underspray!) You'll get cleaner lines if you do this step. I lined the bottom left hand corner of the image with the bottom left hand corner of the canvas so it would be easier to line the other two images. When the white coat is dry (and make sure it's completely dry!), align the gray stencil exactly where you aligned the first stecil, then spray the gray coat. (sorry, I forgot to take a picture of the white coat...)
See that overspray on the top of the canvas? You definitely want to use some cardboard to cover any parts of the canvas that you don't want to be colored. Or you can tape some scrap paper to the edges of the stencil incase that happens. I was lazy so I didn't do that.
Now for the black stencil, do exactly what you did for the first two stencils.
All done!
Friday, May 18, 2007
Cool Stencil Video
This is the next thing I'm going to have to learn to do...multilayered stencils. He doesn't show the complete process, but you get the gist...
Monday, May 14, 2007
Being Domestic Tip: Organizing
We are trying to be more organized so now whenever we make a stencil, we keep it in a large envelope (they're fairly cheap, I got mine at Costco for about $8 for I think about 100). Then, you can label the envelope with a name you designate to it or do what they're meant for, print the image right onto the envelope. I did both and now when I complete a stencil, I'm sure that it'll be safe and sound in its own case and I won't have to pull all the stencils out of their envelopes since they're all labeled now!
This can even be used for organizing your cards. Ex. One evelope for birthdays, another for "get wells soon" cards, etc.
Such an easy thing to do, but you'd be kicking yourself if you never thought of it.
Thursday, May 10, 2007
New shirt

Yesterday, I created a new stencil for the other shirt I plan on sending my sister. This time, it's a picture of a beta fish since she's the proud owner of two. I haven't tested it yet, I hope it works! I'm not even sure what color to print it yet.
My boyfriend also worked on a shirt, but it's not done yet either. Hopefully next week we'll have it all together.
Tuesday, May 8, 2007
Stencil T-Shirt
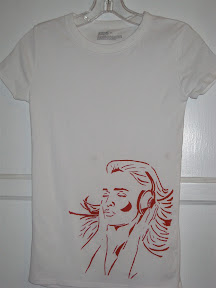
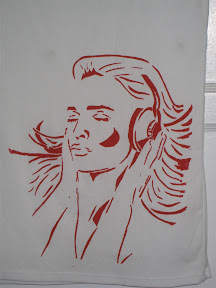
As promised, I began teaching myself how to make stencils and silkscreen. Normally, when you silkscreen, you apply some emulsion to the screen so when you put your image on there and expose it to the sun, the parts under the dark spots of the image do not harden and wash away creating a stencil. But for this shirt, I cut out a stencil from an image I got from a magazine, placed it on the t-shirt, put the framed screen over it and pushed the paint through with a squeegee. This is the result.
I actually didn't want to post this yet, but I'm just so proud of it. =) I wanted to keep a little mystery since I'll be sending this to my sister, but I still have one more shirt to do, so I guess that one will just be a surprise for her.

A closer look:
I actually didn't want to post this yet, but I'm just so proud of it. =) I wanted to keep a little mystery since I'll be sending this to my sister, but I still have one more shirt to do, so I guess that one will just be a surprise for her.
A closer look:
Friday, April 27, 2007
My First Stencil
That video I posted a few days ago of the artist stenciling inspired me, but I was so caught up in crocheting, I didn't think I would begin a new craft so soon. Today, I was looking through my boyfriend's magazine (it was Maxim) and I came across a stencil artist that is not only amazing at stenciling, but he's also amazingly stealthy (he smuggled some of this art into some New York museums!).
Here's one of Banksy's (the featured artist in the magazine) famous works:

So we asked our cook, who's also an artist, if he knew how to stencil and his reply, "Oh my gosh, that's so easy! It's all in the shadows!" Those few words made me produce this.
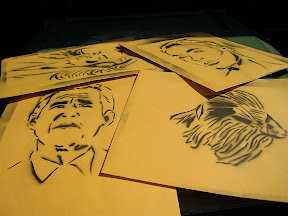
It was a newspaper clipping of some politician, I forget his name, and no, it's not George Bush as everyone thought it was today. I just did exactly as the cook told me to...just cut out the dark parts. Now the black parts are the easy part, but you also want to cut out some of the gray parts (if it's not a 100% black and white photo...which is what I recommend if this is your first stencil). I also spray painted it to test out the stencil and also so you can see it a little better.
It's a fairly easy project to do, very cost efficient and extremely addicting!
A few tips:
- Get a black and white photo (can be a newspaper/magazine clipping, a photo you took yourself, or a picture you got offline). A completely black and white photo (no grayscale here!) is recommended, but not required.
- Use very, very sharp x-acto knife. You can find some high quality blades at an art supply store or even a hardware store. Just make sure it's really sharp and pointed for those fine details
- Heavy paper. If you can, photo copy your image onto some heavy paper. It's not very easy cutting small details onto newspaper (it tears very easily).
- Enjoy! This is a really fun project and once you finish your first one, you'll want to make another, so make sure you set aside a bit of time for this project!
Here's one of Banksy's (the featured artist in the magazine) famous works:

So we asked our cook, who's also an artist, if he knew how to stencil and his reply, "Oh my gosh, that's so easy! It's all in the shadows!" Those few words made me produce this.

It was a newspaper clipping of some politician, I forget his name, and no, it's not George Bush as everyone thought it was today. I just did exactly as the cook told me to...just cut out the dark parts. Now the black parts are the easy part, but you also want to cut out some of the gray parts (if it's not a 100% black and white photo...which is what I recommend if this is your first stencil). I also spray painted it to test out the stencil and also so you can see it a little better.
It's a fairly easy project to do, very cost efficient and extremely addicting!
A few tips:
- Get a black and white photo (can be a newspaper/magazine clipping, a photo you took yourself, or a picture you got offline). A completely black and white photo (no grayscale here!) is recommended, but not required.
- Use very, very sharp x-acto knife. You can find some high quality blades at an art supply store or even a hardware store. Just make sure it's really sharp and pointed for those fine details
- Heavy paper. If you can, photo copy your image onto some heavy paper. It's not very easy cutting small details onto newspaper (it tears very easily).
- Enjoy! This is a really fun project and once you finish your first one, you'll want to make another, so make sure you set aside a bit of time for this project!
Sunday, April 22, 2007
A little inspiration for you
I was going through some YouTube videos hoping I could find a few good vids about crochet or something like that, but instead, I stumbled upon this, and well, I'm more than happy. I'm definitely going to attempt to stencil some things in the near future. I'll try to get as good as this guy! lol.
If you have some informative or just plain fun videos that you'd like to share with us, just email me the video (or the link).
Subscribe to:
Posts (Atom)